
How to Set Up QuickBooks for Small Business [Step-by-Step Guide 2026]
![How to Set Up QuickBooks for Small Business [Step-by-Step Guide 2026]](https://techcapitalhub.com/wp-content/uploads/2026/02/how-to-setup-quickbooks.avif)

Fintech Analyst · Founder of Tech Capital Hub
Marcus has spent more than a decade researching financial technology and business accounting tools. This is the ultimate easy guide to setting up QuickBooks for your small business! He breaks the entire process into simple, step-by-step actions — company setup, bank connections, chart of accounts, invoicing, sales tax, and payroll — so your books stay clean from day one. Every small business owner will love how stress-free the setup becomes!
Here’s the thing nobody tells you when you’re starting a small business: the software setup is where most people quietly make their worst financial mistakes. Not on purpose. They just open QuickBooks, click around, and start entering stuff. It feels fine. Then April rolls around and their bookkeeper sends a bill for 12 hours of cleanup work.
Learning how to setup QuickBooks for small business the right way is one of the most valuable things you can do before you touch a single transaction. This guide walks you through the entire process step by step, in the exact order that matters, so your books stay clean from day one.
Still weighing your options? Our in-depth QuickBooks vs FreshBooks comparison breaks down which platform fits your business type before you invest time in a full setup.
Fair warning: this is a long one. Bookmark it. You won’t finish in one sitting, and that’s fine.
The Fast Answer: How to Setup QuickBooks for Small Business
Set up QuickBooks for a small business in nine easy steps:
- Gather your documents — EIN, legal business structure, and physical address.
- Choose the right plan — match your tier to your team size and needs.
- Enter company information — legal name, address, EIN, industry, and accounting method.
- Connect your bank accounts — link business checking and credit cards.
- Review your chart of accounts — use the industry default provided.
- Add customers and vendors — flag every contractor as a 1099 vendor.
- Create products, services, and invoices — assign each to the right income account.
- Configure sales tax and payroll — map your nexus and enable automated taxes.
- Set user permissions — lock the bank register to admins only.
Plan on 3 to 6 hours for a complete first-time setup. Get the foundation right, and everything else takes care of itself!
Table of Contents
Quick Summary: The 30-Second Setup
Short on time? These are the four easy essentials that keep your books clean from day one! Tap each card to see exactly what to do.
1 Gather First Have your key details ready before you log in
2 The Big Trap Match your deposits — never add them twice
3 Don’t Overcomplicate Stick with the default chart of accounts
4 Tax Tip Map your sales tax nexus early
Nail these four essentials and you’ll sidestep the costly cleanup bill most first-timers face later. It’s the easiest way to keep your setup clean and your April stress-free!
How this guide was built: This step-by-step guide is based on official QuickBooks documentation and help resources, IRS guidance on EINs and worker classification, published payroll and tax resources, and real-world setup workflows. Because pricing, plan features, and tax rules change, always confirm current terms on the official QuickBooks and IRS pages before you act. This article is educational information, not financial or tax advice.

Gather This Stuff Before You Open the Software
Seriously, stop. Don’t log in yet!
The number of people who start setting up QuickBooks Online without their EIN handy is a lot. Then they either use their Social Security number where they shouldn’t, or they save a half-finished setup and forget about it for two weeks.
Here’s what you actually need in front of you:
- Your EIN (Employer Identification Number) — the federal tax ID for your business. You need it to connect a bank account, set up payroll, and automate tax filings. Don’t have one? Apply free through the official IRS Employer ID Number page. It takes about 10 minutes.
- Your legal business structure — LLC, sole prop, or S-corp. QuickBooks uses your entity type to decide which tax forms it generates. Get it wrong and the automated logic is wrong.
- Your business address — a real physical address, not a P.O. box. QuickBooks uses it to calculate sales tax rates.
- Your bank account and routing numbers — plus your business credit card details if you want to connect those too. You should!
- Your recent financial statements — if you’re switching from another tool or spreadsheets, you’ll need these for starting balances.
Okay. Now you can open the software.

Step 1: Pick a Plan That Actually Fits
This is where a lot of new users either underbuy or overbuy, and both are annoying in different ways.
Not sure which version to buy? Before locking in a plan, read our QuickBooks Online vs Desktop breakdown — the 2026 pricing changes affect which tier makes sense for most small businesses.
Here’s the quick breakdown:
- Simple Start or Essentials works fine for most solo operators and tiny teams. As of January 2026, these lower-tier plans can add advanced inventory tracking as a separate module, according to QuickBooks documentation. If inventory was your only reason to consider Plus, check whether the add-on covers your needs first. Confirm current pricing on the official QuickBooks pricing page.
- Plus and Advanced make sense once you need project tracking, custom user roles, or deeper automation.
- Intuit Enterprise Suite is for multi-entity businesses. Probably not where you’re starting.
One choice to sort out at first login: QuickBooks asks whether you want Business View or Accountant View. Business View is the simplified dashboard with cash flow summaries and KPIs front and center. Accountant View is the traditional layout, better for detailed ledger work. Doing this yourself? Business View is less overwhelming. Have a bookkeeper living in your file? Accountant View. You can toggle between them anytime.
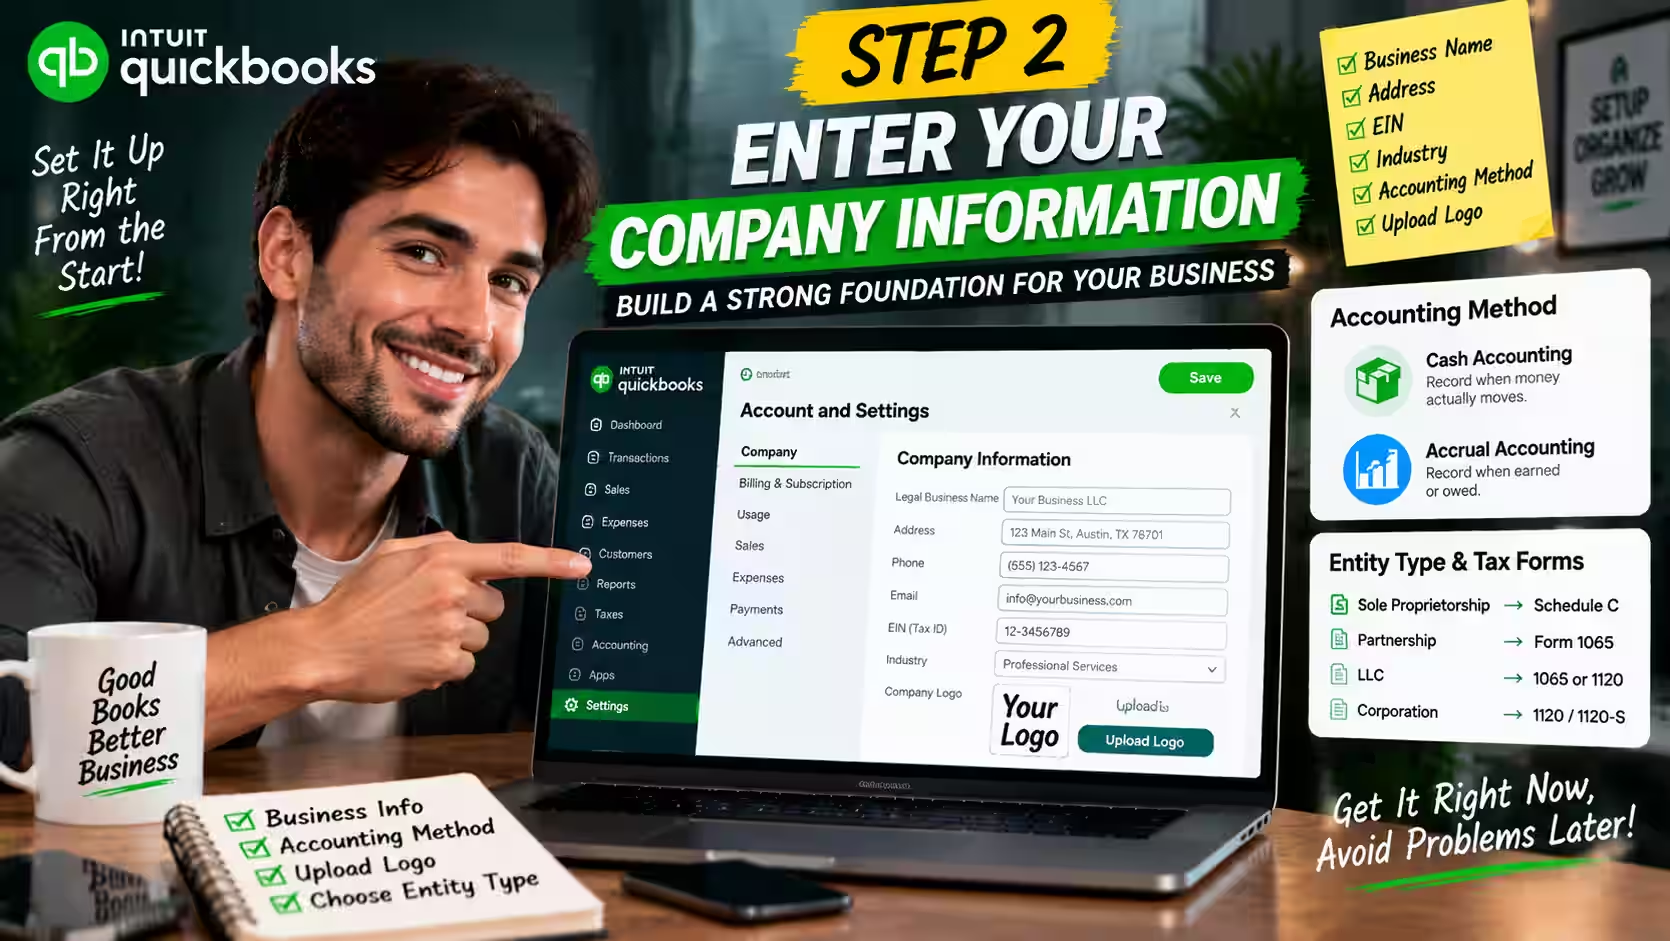
Step 2: Enter Your Company Information
Head into Account and Settings and take your time here. This is where your foundation gets built.
Fill in your legal business name, address, phone, email, EIN, and industry. The industry selection matters — QuickBooks uses it to suggest your starting chart of accounts. Pick the closest match.
What Is an Accounting Method?
Accounting method is simply when you record income and expenses. There are two options:
- Cash accounting records income when a customer pays you and expenses when you pay the bill. It’s simpler. Most small service businesses do fine here.
- Accrual accounting records income when it’s earned and expenses when they’re owed, even if no money has moved yet. It gives a more accurate month-to-month picture but is more complex. Product-based businesses and anyone with a lot of outstanding invoices need accrual.
Here’s the honest take: if you’re not sure which applies, talk to a CPA before you set this. Changing your accounting method later is genuinely painful — it means restating your books. The SBA’s guidance on managing your finances is a helpful starting point for understanding the difference.
Also on this screen: upload your logo. It auto-populates on all your invoices, which is a small thing that makes your business look way more put together!
Your entity type determines which tax forms QuickBooks generates automatically:
| Entity Type | Auto-Generated Tax Form |
| Sole Proprietorship | Schedule C (Form 1040) |
| Partnership | Form 1065 |
| LLC | Form 1065 or 1120 |
| Corporation | Form 1120 / 1120-S |
This is baked into the system logic. For a breakdown of how business structure affects your filings, see the IRS guide on business structures. Get it right now.
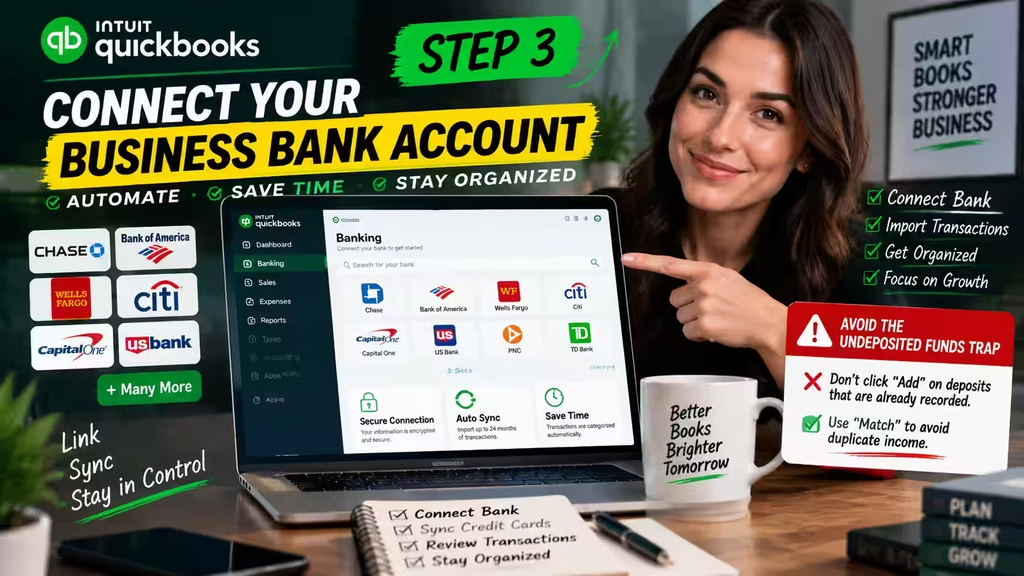
Step 3: Connect Your Business Bank Account
I’ll be direct: people who don’t connect their bank account set themselves up for a bad time. Manually entering every transaction sounds manageable until you have 200 in a month and you’re doing it at 11pm before a client meeting. Just connect the bank!
Go to the Banking tab, type in your bank name, and follow the prompts. Most major US banks and credit unions are supported. You’ll authenticate — sometimes with multi-factor — then pick which accounts to pull in. QuickBooks grabs up to 24 months of history and starts sorting transactions right away.
Do your credit cards too. Same exact process. They all land in the same dashboard.
A note on QuickBooks Checking: You don’t have to open one, but it’s worth knowing about. According to QuickBooks, it’s backed by Green Dot Bank and can earn interest on money you park in “Envelopes,” which are basically mini savings buckets inside your account. The one to set up right away is a tax envelope — you tell it to pull a percentage of every incoming payment automatically. Then in April, instead of scrambling, the money is already set aside. Confirm current APY and any fees on the official QuickBooks product pages, since terms change.
The Undeposited Funds Trap
Undeposited Funds is a holding account for payments you’ve recorded but haven’t yet grouped into a bank deposit. It trips people up constantly.
Here’s what happens: you record a customer payment in QuickBooks. Good. Then your bank feed shows the deposit coming in. Instead of matching it to the payment you already recorded, you click “Add” and create a whole new income entry. Now that money shows up twice. Your income looks higher than it is, your taxes get calculated on phantom revenue, and your reconciliation breaks.
The fix is simple: always use “Match” on deposits, not “Add,” when there’s already a recorded payment waiting for it.
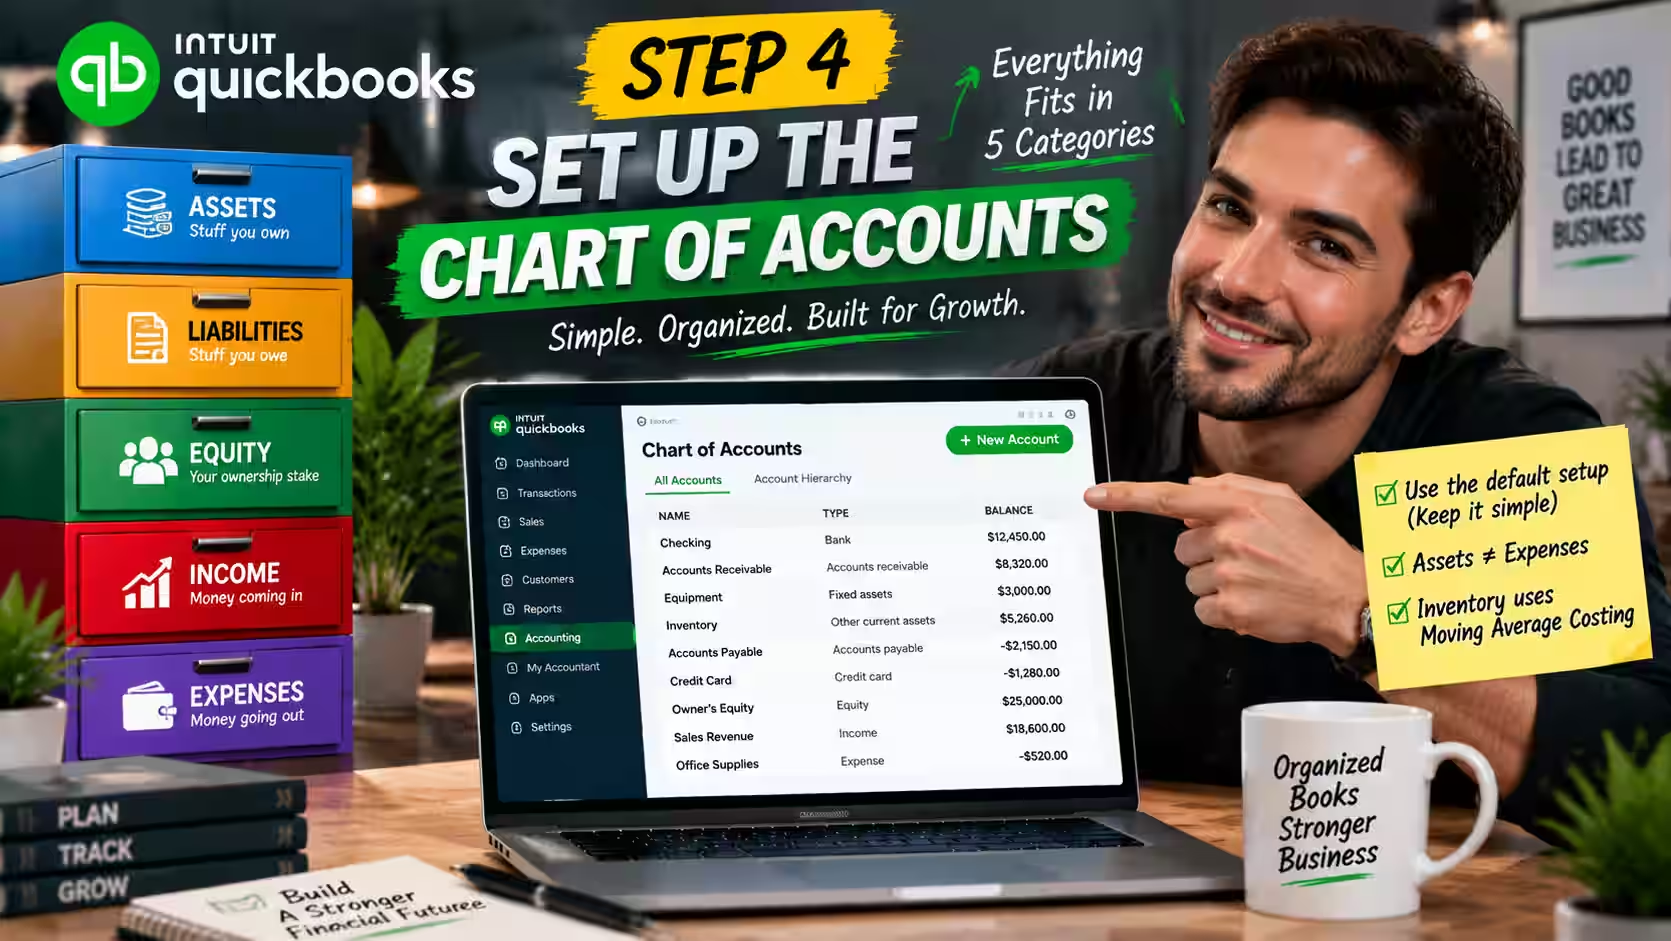
Step 4: Set Up the Chart of Accounts
The chart of accounts gets talked about like it’s intimidating. It’s really not.
What Is a Chart of Accounts?
Think of your chart of accounts as a filing cabinet with five drawers. Every transaction you ever make goes into one of them:
- Assets — stuff you own: your bank account, equipment, inventory.
- Liabilities — stuff you owe: loans, credit cards, sales tax collected but not yet remitted.
- Equity — your ownership stake in the business.
- Income — money coming in.
- Expenses — money going out for operations.
That’s it. Everything fits in one of those five places.
QuickBooks auto-fills a starting chart of accounts based on the industry you selected. For most small businesses in their first year or two, just use it! I know it’s tempting to customize, rename things, and add sub-accounts for every category. Don’t. Every account you add is another place a transaction can get miscategorized — and those are exactly the tangles bookkeepers charge to untangle.
One thing worth flagging: equipment and inventory are assets, not expenses. Buy a $3,000 laptop for the business and it goes on the balance sheet as a fixed asset, not an office supply expense. Inventory you buy for resale is also an asset until you sell it and it becomes cost of goods sold. Getting this backwards ruins your Profit and Loss and creates real problems at audit time.
If you sell physical products, QuickBooks uses Moving Average Costing as the default inventory method. Every time stock comes in at a new price, it blends that with what you have and recalculates an average cost per unit. This matters for your COGS calculation, especially when supplier prices move around — which they will.

Step 5: Build Your Customer and Vendor Lists
Fewer than ten customers and vendors? Manual entry is fine. More than that already sitting in a spreadsheet? Use the CSV import. QuickBooks has a template you can download — format your data to match, import, done.
For customers, you want: full name, business name, billing address, shipping address (if different), payment terms (Net 30, Net 15, etc.), preferred payment method, and email.
For vendors, you need: company name, contact info, payment terms, and whether they’re a 1099 contractor.
That last one is critical. Flag every contractor as a 1099 vendor from the start. QuickBooks then tracks their payments automatically, so you won’t scramble to reconstruct payment history when 1099-NEC forms are due in January. The IRS explains the reporting rules on its Forms 1099 information page.
Messy customer data leads to messy accounts receivable reports. A/R is already annoying to manage. Don’t make it harder!
Step 6: Create Products, Services, and Invoices
Go to Products and Services and build out your item list. This is the menu QuickBooks pulls from every time you create an invoice.
- Service businesses need service items: hourly rates, flat project fees, retainer packages.
- Product businesses need product items with SKUs, pricing, and the correct COGS account assigned.
Carry physical stock? Enable inventory tracking and set your reorder points now, while you’re thinking about it. You’ll thank yourself in six months!
Assign each item to the right income account. That’s what determines how revenue shows up in your reports by category.
Then head to Invoice Templates and spend 15 minutes making your invoices look like they came from a real business. Add your logo, set your brand colors, configure your invoice numbering, and set your payment terms. It takes almost no time and it matters for how clients perceive you.
While you’re there, turn on automated payment reminders. You can set up to three. A common sequence: 3 days before the due date, on the due date, and 7 days after. Businesses using automated reminders get paid faster — that’s just the data. Also configure automatic late fees if you charge them, as a flat amount or a percentage of the invoice total.

Step 7: Sales Tax Setup
Sell taxable products or services? QuickBooks needs to know your nexus.
What Is Sales Tax Nexus?
Sales tax nexus is the connection between your business and a state that requires you to collect and remit sales tax there. It’s usually triggered by physical presence or by hitting a state’s economic sales threshold.
Go to Taxes > Sales Tax and run the automated setup. QuickBooks calculates the correct rate using your business address and your customer’s location, and updates rates automatically when states or counties change them.
For every product and service on your list, mark whether it’s taxable or tax-exempt. This is not a detail to skip — incorrect tax settings are a common audit trigger for small businesses, and they’re a compliance problem either way. Because thresholds and rates vary by state, confirm your obligations with your state’s department of revenue or taxation before you file. The SBA’s guide to state business taxes is a good place to find your state’s authority.

Step 8: Setting Up Payroll
Have any employees, or planning to hire? Set up payroll now. Don’t add it later. Bolting it on after you’ve been running transactions is a reconciliation headache.
You’ll need: federal EIN, state withholding account number, state unemployment tax (SUTA) rate, W-4s from each employee, direct deposit info, and your pay schedule.
According to QuickBooks, new payroll subscribers are enrolled in Automated Taxes and Forms, so the system calculates, withholds, and files federal and state payroll taxes for you — FICA, FUTA, SUTA, and year-end W-2s. This is genuinely one of the best things about the current version! Confirm what’s included in your specific plan on the official QuickBooks payroll pages.
Use QuickBooks Workforce to onboard employees. They log in and enter their own SSNs, bank details, and W-4 info — smarter for both data accuracy and privacy.
Be blunt with yourself about worker classification. Know whether each person is a W-2 employee or a 1099 contractor before you set them up. Misclassifying one for the other is not a small mistake — the IRS takes it seriously. W-2 employees have taxes withheld by you; contractors pay their own self-employment taxes. Review the IRS guidance on independent contractor vs. employee status and the withholding rules in IRS Publication 15 (Employer’s Tax Guide) before finalizing anyone.
Payroll records generally must be kept for at least three years to comply with federal recordkeeping rules; the U.S. Department of Labor outlines the requirements. QuickBooks retains these automatically.
Want a deeper dive into costs and tiers? Our full QuickBooks Payroll pricing and features review covers every tier with real monthly cost examples.
Payroll records have to be kept for at least three years to comply with the Age Discrimination in Employment Act. QuickBooks does this automatically.
If you want a deeper dive into costs, tiers, and whether the payroll add-on is worth it for your team size, our full QuickBooks Payroll pricing and features review covers every tier with real monthly cost examples

Step 9: User Permissions and Access Control
Just you? Skip this for now. Have staff, a bookkeeper, or a CPA in your file? This section matters.
Also, migrating financial data from spreadsheets? Our step-by-step guide to switching from Excel to QuickBooks covers the exact import order, data cleaning steps, and post-migration checks that prevent reconciliation errors.
Giving team members full access is a security risk. It also creates a data problem, because people with access to things they shouldn’t touch will eventually touch them by accident.
Role Permissions at a Glance
Give each team member exactly the access they need — no more, no less! This easy table shows what every role can and can’t do.
| Role | Can Do | Cannot Do |
|---|---|---|
| Sales Manager |
|
|
| Expense Manager |
|
|
| Inventory Manager |
|
|
Keep bank register access with the admin or bookkeeper only! One edit to a cleared transaction can break a prior reconciliation — an expensive fix you can easily avoid.
The bank register is locked for most roles for a specific reason: if someone edits a cleared transaction, they can break a prior reconciliation. That leaves your books wrong in a way that requires a CPA to fix — expensive and avoidable. Leave register access to the admin or bookkeeper only.
To invite your CPA or external accountant, use Invite Accountant. They get access without taking up one of your paid user seats.
The Mistakes That Cost People the Most
Before you go live, read these. Fixing them after the fact is never cheap.
- Deleting invoices to process refunds. This destroys your audit trail. Always issue a Credit Memo instead — the invoice stays, the credit cancels the balance, and your records stay clean.
- Using the wrong accounting method. Set cash when you should be on accrual and you can’t just flip a switch — you have to restate your financials. Make the call before setup.
- Skipping opening balances. Setting up mid-year? Your bank and credit card accounts need a starting balance as of your start date. Without it, your balance sheet is wrong from the beginning and every report that flows from it is wrong too.
- Making your chart of accounts too complicated. More accounts doesn’t mean better data. It just means more ways for things to be miscategorized. Use the defaults. Add accounts only for a specific, clear reason.
- Paying a bill with “Write Checks” when you’ve already entered it as a Bill. This doubles the expense on your Profit and Loss. Use the Pay Bills window for any bill already logged. Write Checks is for one-off payments that aren’t bills.
People Also Ask
How long does QuickBooks setup take?
Plan on 3 to 6 hours for a complete initial setup. Add another hour or two if you’re importing data or configuring payroll. Don’t try to do it in one sprint before you’ve gathered all your info.
Do I need an accountant to set up QuickBooks?
No. Most small business owners can handle the setup themselves, especially with a guide like this. That said, paying a CPA for a one-time chart of accounts review and accounting method confirmation is usually worth it — an hour upfront can save you a much bigger bill later.
Can I change settings after setup?
Most of them, yes. The two you really don’t want to change after launch are your accounting method and fiscal year, since they affect every report. Everything else is fairly adjustable.
What if I make a mistake during setup?
Most mistakes are fixable. Misassigned accounts, incorrect starting balances, and wrong items can be corrected. The structural stuff — accounting method or entity type — takes more work to unwind.
Can I set up QuickBooks on my phone?
Basic tasks, yes. For the full setup including payroll, chart of accounts, and user permissions, use a desktop browser. The mobile app doesn’t have all the features.
How do I switch from another accounting tool to QuickBooks?
QuickBooks accepts CSV imports for customers, vendors, and product/service lists. For transaction history, import via CSV or enter opening balances manually as of your start date. Intuit also offers professional migration services for larger, more complex data sets.
Your QuickBooks Setup Checklist
This is the ultimate easy checklist to finish your setup the right way! Tick off each item as you go — every green check brings you one step closer to a clean, stress-free launch.
Once every required item is checked, you’re ready to go live! Send that first real invoice with confidence — your books are clean, your setup is solid, and your stress-free April is locked in!
The Bottom Line
Knowing how to set up QuickBooks correctly is genuinely valuable — but don’t let perfect be the enemy of done.
Start with what you have. Connect the bank. Use the default chart of accounts. Get your first invoice out. QuickBooks is forgiving about most things, and you can tighten the configuration as you learn what you actually need.
What’s not forgiving: choosing the wrong accounting method, skipping opening balances, or letting transactions pile up unreconciled for months. Those are the expensive ones. Everything else is adjustable.
Here’s your priority order: nail the accounting method and entity type first, enter opening balances if you’re starting mid-year, and lock down bank register access before anyone else touches your file. Get that foundation solid, and the AI tools, automated tax filings, and cash flow forecasting all work better on top of a clean setup.
Now go send that first invoice!
Business Tools · Editorial Integrity
Sources & Citations
The best official documentation and authoritative public guidance behind this easy, step-by-step guide to setting up QuickBooks for your small business — covering EINs, entity types, chart of accounts, bank connections, invoicing, sales tax, payroll, and recordkeeping!
Every step in this simple setup guide is grounded in official product documentation and authoritative government resources! Plan and feature details reference the official QuickBooks pricing, help, and payroll pages, tax setup guidance follows IRS resources on EINs and worker classification, and recordkeeping notes draw on Department of Labor and SBA guidance. Because pricing, plan features, and tax rules change often, always confirm the latest details on the official QuickBooks and IRS pages before you act.
View full sources, methodology, and editorial notes
This easy setup guide was written using official QuickBooks documentation and help resources, primary IRS guidance, and authoritative federal and state government resources. We give preference to official product pages, IRS publications, and primary government sources wherever they directly support a claim about plan selection, company setup, chart of accounts, bank connections, sales tax nexus, payroll, worker classification, or recordkeeping requirements. A few points are described in general terms where exact figures or terms shift often, especially plan pricing and feature availability. This article is general educational information, not financial or tax advice.
- QuickBooks Online product & help: QuickBooks — Product & Help Center — cited for setup workflows, Business View vs. Accountant View, bank feed matching, and chart of accounts defaults.
- QuickBooks pricing & plans: QuickBooks — Pricing — cited for standard plan tiers, published monthly rates, add-on modules, and included features.
- QuickBooks payroll & team management: QuickBooks — Payroll (Workforce) — cited for automated taxes and forms, direct deposit, employee onboarding, and payroll setup steps.
- Employer Identification Number (EIN): IRS — Get an Employer Identification Number — cited for how to apply for a free federal tax ID before connecting a bank account or running payroll.
- Business structures & tax forms: IRS — Business Structures — cited for how entity type determines the tax forms your setup generates.
- Worker classification (W-2 vs. 1099): IRS — Independent Contractor or Employee — cited for correctly classifying workers before adding them to payroll or vendor lists.
- Employer payroll tax withholding: IRS — Publication 15 (Employer’s Tax Guide) — cited for federal payroll tax withholding rules referenced in the payroll setup step.
- 1099 contractor reporting: IRS — Forms & Taxes for Independent Contractors — cited for flagging 1099 vendors and year-end 1099-NEC reporting.
- Payroll recordkeeping requirements: U.S. Department of Labor — FLSA Recordkeeping — cited for the requirement to retain payroll records for the required minimum period.
- Small business finances & state taxes: U.S. Small Business Administration (SBA) — cited as a primary government resource for managing business finances, paying taxes, and locating your state’s department of revenue for sales tax nexus and filing requirements.
How to Set Up QuickBooks for Small Business (2026) · Editorial Standards
Our Editorial Standards
Tech Capital Hub applies Google’s E-E-A-T framework to every setup guide, favoring easy, plain-English steps, official documentation, and practical workflows over hype or unsupported claims. This is the ultimate step-by-step QuickBooks setup guide for small business owners! Specific steps anchor to trusted references — official QuickBooks documentation and help pages for plan selection, bank feeds, and chart of accounts, IRS guidance on EINs and worker classification for company and payroll setup, IRS Publication 15 for payroll tax withholding, plus Department of Labor and U.S. Small Business Administration guidance for recordkeeping and state taxes. From your first company screen to your first invoice, every step is grounded in a source you can check yourself!
View how our editorial standards apply to this article
Written for Real Small Business Setups
This is the easiest, most practical walkthrough for setting up QuickBooks the right way! We meet business owners right where they are — from a solo freelancer connecting a first bank account to a growing team onboarding payroll. Everyday framing anchors each step, like why matching deposits stops double-counted income or why a tax envelope saves you from an April scramble, so your setup feels clear and confident before you enter a single transaction.
Setup Steps Explained Without the Jargon
Coverage breaks down the choices that shape your books from day one. We clarify how to pick the right plan, when to choose cash vs. accrual accounting, why the default chart of accounts beats over-customizing, and how sales tax nexus and worker classification affect your setup. Every term — undeposited funds, chart of accounts, nexus, W-2 vs. 1099 — is defined in plain, easy language before it’s ever used.
Official Sources Behind Every Step
Specific steps are anchored to the best trusted references. Setup workflows point to official QuickBooks documentation and help pages, EIN and entity guidance follows the IRS, worker classification references IRS guidance on independent contractors vs. employees, and payroll withholding follows IRS Publication 15. Recordkeeping guidance references the U.S. Department of Labor, and state tax and finance guidance references the U.S. Small Business Administration. We avoid promotional content and unverified numbers as support for any step.
Honest About Traps, Trade-offs, and Fixes
We state the traps as plainly as the wins: the wrong accounting method means restating your books, skipping opening balances breaks your balance sheet, and misclassifying a worker invites real IRS trouble. Because pricing, plan features, and tax rules change often, this guide is reviewed and updated over time. Nothing here is financial or tax advice. Corrections or source challenges can be sent to editorial@techcapitalhub.com.
How to Set Up QuickBooks for Small Business (2026) · About the Author
Marcus Delray
Fintech Analyst · Founder of Tech Capital Hub
Marcus Delray is a fintech analyst and the founder of Tech Capital Hub. This is the ultimate easy guide to setting up QuickBooks for your small business! In a simple, step-by-step walkthrough, Marcus shows you how to gather your EIN and entity details, pick the right plan, connect your bank feeds, review your chart of accounts, set up sales tax and payroll, and lock down user permissions. It’s the confidence-building roadmap every small business owner will love!
View full author bio, credentials, and links
Marcus Delray has spent over a decade researching financial technology. He built Tech Capital Hub to turn that research into easy, useful guides for everyday readers — from first-time business owners to teams ready to scale. He covers business accounting tools, AI in finance, fintech, and small business software, with a consistent focus on turning dense topics into clear, actionable steps.
This guide is his simple, start-to-finish answer to setting up QuickBooks the right way! Marcus walks small business owners through every screen — gathering your EIN and legal structure, choosing cash vs. accrual accounting, entering company information, and connecting bank and credit card feeds. He explains why matching deposits stops double-counted income, why the default chart of accounts beats over-customizing, and how to map your sales tax nexus so rates stay accurate.
He breaks down payroll onboarding with automated taxes, correct W-2 vs. 1099 worker classification, opening balances for mid-year setups, and the user permissions that protect your bank register from costly reconciliation errors. He also flags the common setup mistakes that lead to expensive cleanup bills. Every step is grounded in official QuickBooks documentation and IRS, DOL, and SBA guidance. All articles are educational information, not financial or tax advice.
- Walks small business owners through the full QuickBooks setup in plain, jargon-free language — from EIN prep to your first invoice
- Explains company setup, accounting method, chart of accounts, bank feeds, sales tax nexus, and payroll onboarding step by step
- Clarifies real-world traps like the undeposited funds double-count, skipped opening balances, and over-complicated chart of accounts
- Details correct W-2 vs. 1099 worker classification, user permissions, and the recordkeeping rules that keep your books audit-ready
- Grounds coverage in official QuickBooks documentation plus IRS, Department of Labor, and SBA guidance, with clear educational framing and no financial advice
Enjoying our content?
Click below to add us as a preferred source. Google will prioritize our latest articles in your Top Stories, AI Mode, and AI Overviews.
Preferred Source on Google